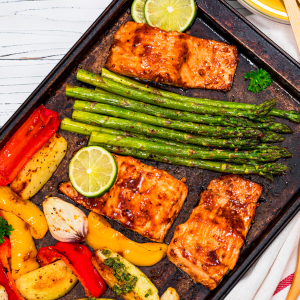
The unassuming baking sheet faithfully stands by our side, aiding us in our culinary endeavors, but often receives little attention. Burnt residues, sticky caramel, and charred oils from repeated baking sessions might leave these sheets looking dull and worn out, but don't give up on them just yet! In this comprehensive blog, discover how to rejuvenate your beloved baking sheets and secure their longevity as the go-to tools in your kitchen.
Why Do Baking Sheets Darken?
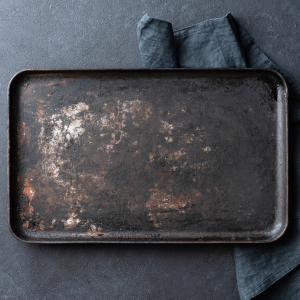
Baking sheets, like any other cooking utensils regularly exposed to high temperatures, are susceptible to changes in appearance over time. Specifically, they often take on a darker hue and may develop a layer of black residue. This darkening is a natural outcome of consistent use.
The primary reason for this discoloration is exposure to high heat. During baking, the oils, fats, and sugars, often part of our recipes, can seep onto the baking sheet. When subjected to the intense heat of the oven, these substances undergo chemical reactions, resulting in a residue that clings to the baking sheet. With repeated baking sessions, this residue builds up layer upon layer, gradually darkening the pan. Remember, though, that a darker pan isn't necessarily a bad thing.
How Can You Make Your Baking Pans Look New?
With time and continued use, baking sheets often accumulate stains and residues, which may cast a shadow over their once-shiny veneer. Thankfully, refurbishing them is an easy task, given the right tools and techniques.
- Gentle Cleaning: This is your go-to method for tackling those minor daily stains and residues. A homemade mix of baking soda and warm water can work wonders here. This solution offers a non-abrasive yet effective means of cleaning, which, when coupled with a sponge, cloth, or scouring pad, can free your baking sheets from undesirable blemishes.
- Vinegar Soak: Certain stubborn stains demand a more aggressive approach. A soak in white vinegar proves highly effective in these cases. Allow your baking pans to steep in this cleansing agent for several hours, then give their surface a gentle but thorough scrubbing to dislodge any persistent grime.
- Maintenance: Consistency is key in maintaining the appearance and functionality of your baking sheets. Make a habit of regular cleaning after each use to prevent the buildup of stains and residues. Avoid using sharp utensils that may scratch the surface, and always store your pans well to protect them from accidental damage
Maintaining Different Types of Baking Sheets
Baking sheets come in a variety of materials, each with its own unique attributes and cleaning needs. Here's an ultimate guide to extending the life of different types of baking sheets with proper cleaning practices.
Aluminum Baking Sheets
Aluminum baking sheets are a popular choice due to their excellent heat conductivity. However, aluminum can discolor and darken over time. This stellar feature enables aluminum baking sheets to heat up rapidly and distribute that heat evenly across their surface, which provides consistent outcomes. However, these baking sheets tend to discolor and darken over time.
Cleaning Techniques
- Baking Soda and Water Paste
- Create a paste from baking soda and water.
- Spread the paste on the baking sheet and let it set for about 30 minutes.
- Using a nylon pad, sponge, scouring pad, or brush, gently scrub the surface until clean.
- Finally, wash the baking sheet with dish soap and warm water.
- Treatment of Baking Soda and Hydrogen Peroxide
- Sprinkle the sheet with baking soda and pour hydrogen peroxide on top.
- Add another layer of baking soda and let it sit for a while.
- Scrub off the mixture, then wash and dry the baking sheet thoroughly.
Silicone Baking Mats
Silicone baking mats can withstand wide temperature ranges and can be safely used in the oven, microwave, and freezer. They're designed to be durable and resilient, making your baking process easier and more efficient. These offer a great non-stick baking surface and are heat-resistant, but they can hold onto odors and become sticky over time.
Cleaning Technique
- Wait for the mat to cool down after use.
- Use a soft sponge or cleaning cloth with mild dish soap and warm water to gently wash the surface.
- For more stubborn residue, create a paste of baking soda and water, and gently scrub the mat using a soft cloth.
- Rinse well with warm water to remove any soap or residue.
- Lay the mat flat or hang it to air-dry completely before storing.
Remember, regardless of the baking sheet materials, always dry them thoroughly after cleaning to prevent rust, mold, and odor, and avoid using sharp utensils that can scratch and damage the surface.
Non-Stick Baking Sheets
Non-stick baking sheets make baking and clean-up an absolute breeze. Their unique coating prevents food from gripping the surface, ensuring an easy release. However, they need careful handling and non-abrasive cleaning to maintain their non-stick surface.
Cleaning Technique
- Allow the baking sheet to cool after use before cleaning.
- Use a soft sponge or cloth, mild dish soap, and warm water to gently clean the surface.
- Avoid using abrasive cleaners or scouring pads, as they can chip away the non-stick coating.
- Rinse thoroughly, ensuring no soap residue remains.
- Dry completely before storing to prevent moisture-induced damage.
Stainless Steel Baking Sheets
Stainless steel is renowned for its robustness, resisting warping and rust better than aluminum. It offers a suitable balance of heat efficiency and durability. Given their sturdiness, stainless steel baking sheets are ideal for heavy-duty baking and roasting tasks.
Cleaning Technique
- Soak the baking sheet in warm water immediately after use.
- Use a non-abrasive sponge or cloth with mild detergent to clean the surface.
- For stubborn stuck-on food, create a paste of baking soda and water, apply it to the area, let it sit for a few minutes, and then scrub gently.
- Rinse the baking sheet thoroughly with warm water.
- Dry the baking sheet completely to prevent water spots and enhance its shine.
Insulated Baking Sheets
Insulated baking sheets feature a layer of air trapped between two layers of metal. This insulation regulates heat circulation, preventing food from quickly browning or burning, making them ideal for delicate items.
Cleaning Technique
- Let the baking sheet cool completely after use.
- Use a soft cloth or non-abrasive sponge, mild dish soap, and warm water to gently clean the surface.
- Dry promptly and fully, considering these sheets can trap water between their layers if not dried well.
Note: Avoid harsh cleaners or scrub pads that can damage the sheet's sensitive surface.
Restoring the Shine
As they age, baking sheets often lose their initial luster, darkening due to repeated exposure to high temperatures and the accumulation of food residues. Nevertheless, this discoloration doesn't signify the end; it merely calls for some loving care and maintenance. Practices like gentle cleaning, vinegar soaks, and regular upkeep can restore aesthetic appeal and functionality, ensuring our baking sheets remain valuable kitchen companions.