How To Use Cookie Cutters
To use cookie cutters, roll chilled dough to an even ¼-inch thickness, press the cutter straight down without twisting, and lift away the excess dough. Flour or chill the cutter between cuts to prevent sticking, then chill the shaped cookies before baking so they hold their shape. This hub covers every technique, tool type, and fix.
Learning how to use cookie cutters is the fastest way to turn ordinary dough into consistent, sellable, photo-ready cookies. The technique matters more than the tool: the same star-shaped cutter produces crisp points in one kitchen and blurry blobs in another, and the difference almost always comes down to dough temperature, rolling thickness, and cutting motion. In 15+ years supplying 40,000+ foodservice operations, we've watched bakeries fix "spreading" complaints without changing a single recipe — just the process. This guide consolidates everything: choosing the right cutter, the 12 techniques professionals rely on, cutting before versus after baking, imprint cutters, and how cutters differ from cookie presses and stamps.
TL;DR — Cookie Cutters at a Glance
- Roll dough to ¼ inch, chilled, on a lightly floured surface or between parchment sheets.
- Press straight down — never twist. Twisting seals and distorts the edges.
- Dip the cutter in flour (or chill it) between cuts to stop sticking.
- Chill cut shapes 10–15 minutes before baking to prevent spreading.
- Cut before baking for rolled doughs; cut after baking only for bar-style or warm slab cookies.
- Metal cutters (stainless or copper) cut cleaner than plastic; plastic is safest for kids and softest doughs.
Quick Comparison: Cookie Cutter Materials
| Material | Best Use | Durability | Price Tier |
|---|---|---|---|
| Stainless steel | Everyday commercial use; clean edges in firm doughs; dishwasher-friendly | Excellent — resists rust and bending under volume | $–$$ |
| Copper | Heirloom and display-quality cutters; sharp edges in thick doughs | Very good — sturdy gauge, but needs hand-washing and thorough drying | $$$ |
| Plastic | Kids' programs, soft doughs, fondant, intricate novelty shapes | Fair — edges dull and can warp with heat | $ |
How Do Cookie Cutters Work?
A cookie cutter is a shaped band of metal or plastic with a sharpened bottom edge that slices cleanly through rolled dough, leaving a uniform shape behind. The category breaks down into three functional groups: outline cutters (a simple shaped wall — the classic star, heart, or circle), imprint or impression cutters (an outline plus an internal stamp that embosses detail into the dough), and cutter sets (graduated sizes of one shape, used for tiered displays, linzer-style sandwich cookies, and portion scaling).
Every technique in this guide serves one goal: getting the dough out of the cutter looking exactly like the dough inside the cutter. That means managing three variables — dough temperature (cold dough releases cleanly), rolling thickness (even thickness bakes evenly), and cutting motion (straight down, no twisting). Master those three and any cutter in your drawer will perform.
What Types of Cookie Cutters Should You Buy?
The best cookie cutter for most kitchens is a stainless steel cutter with a rolled or comfort-grip top edge: it cuts cleanly, survives commercial dishwashers, and costs little enough to buy in full shape sets. Material is the first buying decision, because it determines edge sharpness, lifespan, and cleanup.
Stainless Steel Cookie Cutters
Stainless steel is the workhorse material for quality cookie cutters. It holds a sharp cutting edge through thousands of cuts, resists corrosion, and doesn't flex when you press through cold, firm dough. Our foodservice customers consistently tell us stainless cutters are the only material that holds its edge and shape through true commercial volume — hundreds of cuts per shift, day after day, plus dishwasher cycles that would warp plastic. For high-output holiday production, a set like the Pastry Tek 10-piece metal star cookie cutter set gives you graduated sizes of one shape so you can scale a single recipe across tiered trays and price points.
Copper Cookie Cutters
Copper cookie cutters are the premium tier: heavier-gauge walls, beautiful presentation, and edges sharp enough for thick shortbread and gingerbread. They are often sold as heirloom or display pieces, and they double as décor between bakes. The trade-offs are price and care — copper must be hand-washed and dried immediately to prevent tarnish, which makes it better suited to home bakers and boutique shops than to high-volume dish pits.
Plastic Cookie Cutters
Plastic cutters are inexpensive, safe for children's baking programs, and available in more novelty shapes than any other material. The cutting edge is blunter than metal, so they perform best in soft sugar-cookie doughs and fondant rather than firm, chilled gingerbread. Expect to replace them more often: edges dull, and heat (a hot dishwasher, a warm oven-side counter) can warp them out of true.
What Makes a Cookie Cutter Food-Safe?
A food-safe cookie cutter is made from materials authorized for repeated food contact. In the United States, the FDA regulates food-contact substances — including the polymers used in plastic baking tools and the coatings on metal ones — under Title 21 of the Code of Federal Regulations, Parts 175–178, which authorize each substance by identity and intended conditions of use (FDA, Inventory of Food Contact Substances Listed in 21 CFR). In practice: buy from suppliers who specify food-grade stainless steel or FDA-compliant plastics, avoid decorative cutters not sold for food use, and retire any cutter with flaking coating, rust spots, or cracked plastic where bacteria can hide.
Buying Checklist for Quality Cookie Cutters
- Cutting edge: thin and even, with no gaps at the seam where the shape joins.
- Top edge: rolled, folded, or fitted with a comfort grip so repeated pressing doesn't hurt your palm — a real factor at commercial volume. The Pastry Tek 3-piece angel cutter set with comfort grip is a good example of this design.
- Depth: at least 1 inch of wall so the cutter clears ¼-inch to ½-inch dough without the top edge dragging.
- Shape complexity: match detail to your dough — intricate snowflake points need firm, cold dough and a metal edge.
- Sets over singles: graduated sets cost less per cutter and unlock sandwich cookies, tiered displays, and multiple portion sizes.
How To Use Cookie Cutters: 12 Pro Techniques
Using cookie cutters correctly comes down to a repeatable sequence: cold dough, even roll, floured cutter, straight press, clean lift, second chill, then bake. Here is the full professional workflow, step by step.
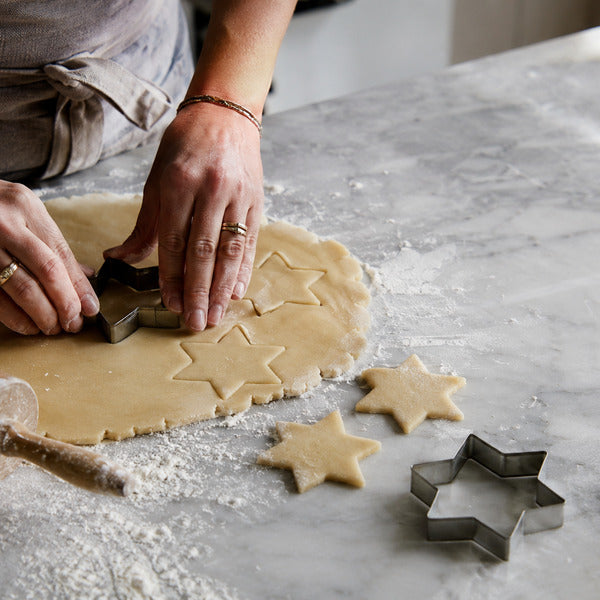
1. Start With Properly Chilled Dough
Chill rolled-cookie dough for at least 1–2 hours (or overnight) before cutting. Cold butter is firm butter, and firm dough holds crisp edges instead of smearing under the cutter. If the dough cracks when you roll it, it's too cold — let it sit 5–10 minutes and try again.
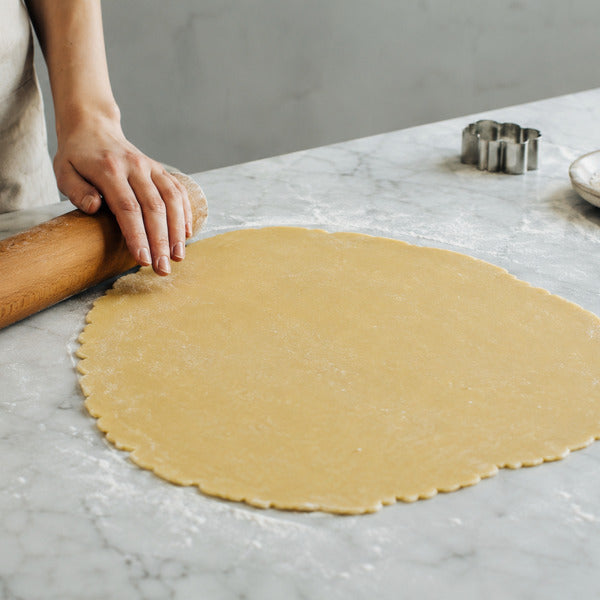
2. Roll to an Even ¼-Inch Thickness
Roll dough to a uniform ¼ inch — the standard for cut-out cookies — using rolling pin guide rings or two ¼-inch dowels as rails. Even thickness is non-negotiable: thin spots brown before thick spots set, and uneven cookies snap during decorating. Rolling between two sheets of parchment keeps flour out of the dough and makes cleanup faster.
3. Flour or Chill the Cutter Between Cuts
Dip the cutting edge in flour (or powdered sugar for dark doughs like chocolate) before every few cuts. The dry barrier stops dough from gripping the cutter walls. For very sticky doughs, park the cutters in the freezer for 10 minutes first — a cold cutter releases dough the way a cold knife slices soft cheese.
4. Press Straight Down — Never Twist
Push the cutter straight down through the dough with even pressure until you feel the work surface, then lift straight up. Twisting is the single most common cutout mistake: it drags the walls of the shape, blurs details, and seals the cut edge so the cookie rises unevenly. If the shape doesn't release, twist is not the fix — flour is.
5. Cut Close Together to Minimize Re-Rolling
Arrange cuts edge-to-edge, leaving as little scrap as possible. Every re-roll works more flour into the dough and toughens the final cookie. Professionals plan the layout like a stencil: big shapes first, small shapes in the gaps.
6. Lift the Scraps, Not the Shapes
Instead of prying each cutout off the counter, peel away the surrounding scrap dough and leave the shapes in place. The cutouts stay flat and undistorted, ready to transfer. This one habit eliminates most stretched, lopsided cookies.
7. Transfer With a Thin Offset Spatula
Slide a thin, floured offset spatula fully under each shape and move it to a parchment-lined baking sheet in one motion. Supporting the whole shape prevents arms, points, and legs from sagging mid-air — the reason so many gingerbread people arrive at the tray with one short leg.
8. Chill the Cut Shapes Before Baking
Chill the shaped cookies on their tray for 10–15 minutes in the refrigerator (or 5 in the freezer) before they go in the oven. Re-solidifying the butter is the most reliable anti-spreading step in the entire process — cold shapes set before the fat has a chance to melt outward.
9. Bake Cold Dough in a Fully Preheated Oven
Put chilled shapes directly into a fully preheated oven, typically 350°F for sugar cookies. A hot oven sets the structure of the cookie quickly, locking the shape; a still-heating oven gives the butter a long, warm window to spread. Use an oven thermometer — many ovens run 25°F off their dial.
10. Re-Roll Scraps Once, Maybe Twice
Press scraps together gently (don't knead), chill them again, and re-roll a maximum of once or twice. After that, the dough is overworked and over-floured; cookies from third-generation scraps bake up tough and misshapen. Bake the last scraps as "baker's snacks" rather than forcing another cutout round.
11. Cool Completely Before Decorating
Cool cookies on the tray for 5 minutes, then on a rack until fully room temperature before icing. Warm cookies melt royal icing and buttercream, bleeding colors and softening crisp outlines. Decorating patience is the last technique that separates clean, saleable cookies from smudged ones.
12. Wash and Dry Cutters Immediately
Wash cutters in warm, soapy water right after use and dry them completely — especially metal seams, where trapped moisture causes rust. Stainless steel tolerates the dishwasher; copper and most plastics should be hand-washed. Store cutters nested and dry, and they'll last for years of service.
Do You Use Cookie Cutters Before or After Baking?
Use cookie cutters before baking for almost all rolled doughs — sugar cookies, gingerbread, shortbread. Cutting raw dough gives clean edges and lets the shape set in the oven. Cutting after baking works only in one scenario: slab or bar-style cookies. Bake the dough as a full sheet, then press the cutter through the still-warm slab within the first couple of minutes out of the oven, before it firms up. This "cut-while-warm" method is how bakeries get perfectly shaped brownie hearts and chocolate chip cookie rounds — shapes that would spread hopelessly if cut raw. The trade-offs: you'll have edge scraps (kitchen snacks or crumb toppings), and delicate cutters with fine details won't punch cleanly through a baked slab, so stick to simple, sturdy shapes.
How Do You Keep Cookies From Spreading When Using Cookie Cutters?
Cookies spread when the butter melts before the structure sets, so every anti-spreading fix targets fat temperature and oven heat. Work through this checklist in order:
- Chill twice: chill the dough before rolling and chill the cut shapes 10–15 minutes before baking. This is the highest-impact fix.
- Check your recipe: use a dough written for cutouts — lower in leavening and higher in flour than drop-cookie recipes. Extra baking powder or soda puffs and distorts shapes.
- Don't over-cream: beating butter and sugar until very fluffy whips in air that expands in the oven. For cutouts, cream just until combined.
- Preheat fully: a hot oven sets edges fast. Verify with an oven thermometer.
- Skip greased pans: bake on parchment, not a greased sheet — grease lubricates spreading.
- Use cool trays: never put cutouts on a baking sheet that's still warm from the last batch.
If shapes still spread after all six fixes, the dough itself is too high in fat or sugar for cutouts — switch to a purpose-built rolled-cookie recipe rather than fighting it.
Can You Use Cookie Cutters With Chocolate Chip Cookies or Premade Dough?
Yes — you can use cookie cutters with both chocolate chip cookie dough and store-bought premade dough, but each needs an adjustment because neither is formulated for cutouts.
Chocolate chip dough is soft, high in fat, and full of chips that block a cutting edge. Two working methods: (1) use mini chocolate chips, chill the dough thoroughly, roll to ⅜ inch, and cut simple, large shapes — fine details won't survive; or (2) bake the dough as a slab and cut shapes while it's warm, as described in the before/after section above. The slab method gives dramatically cleaner shapes with chip-loaded doughs.
Premade refrigerated dough (the sugar-cookie logs and sheets sold in grocery dairy cases) is softer and spread-prone compared with scratch cutout dough. Firm it up by kneading in 2–4 tablespoons of flour per roll of dough, then chill it again before rolling ¼ inch thick. Cut, chill the shapes, and bake on parchment. Expect slightly softer edges than a scratch recipe — acceptable for casual bakes, not for detailed decorated sets.
How To Use Imprint and Impression Cookie Cutters
Imprint cookie cutters (also called impression cutters) cut the outline and emboss a design into the dough in one press. Because they push detail into the surface, they demand firmer dough and a more deliberate press than plain cutters:
- Use a low-spread, chilled dough. Any puff in the oven erases the embossing, so shortbread-style recipes with little or no leavening hold impressions best.
- Flour the stamp face, then tap off the excess. The detailed plate is the stickiest part of the tool.
- Press in two stages. First press the outline through the dough, then apply firm, even pressure to the stamp plate so the full design registers. Rock gently — don't twist.
- Lift straight up and check the first cookie. If the impression is shallow, the dough is too cold and hard; if it's smeared, the dough is too warm. Adjust and continue.
- Chill before baking, and bake just until set. Overbaking browns away the shadow lines that make the design visible.
Dust finished imprinted cookies with powdered sugar or brush the raised areas with luster dust to make the design pop without covering it in icing.
Cookie Cutters vs. Cookie Presses vs. Cookie Stamps: What's the Difference?
A cookie cutter slices shapes from rolled dough; a cookie press extrudes soft dough through a shaped disk; a cookie stamp flattens a dough ball while embossing a design. They are three different tools for three different doughs — and knowing which to reach for saves an entire batch.
Cutter vs. Press vs. Stamp
| Tool | How It Works | Dough Type | Classic Result |
|---|---|---|---|
| Cookie cutter | Pressed down through rolled dough to slice a shape | Firm, chilled, rolled (sugar cookie, gingerbread) | Flat decorated cutouts |
| Cookie press (gun) | Soft dough extruded through a die plate onto the sheet | Soft, room-temperature spritz dough | Spritz cookies, dozens per minute |
| Cookie stamp | Pressed onto a dough ball to flatten and emboss | Firm shortbread-style, low-leavening | Round embossed cookies |
How To Use a Cookie Press (Cookie Gun)
A cookie press works by extruding soft dough through a shaped disk each time you squeeze the trigger — which is why it's often called a cookie gun. The rules are nearly the opposite of cutter rules: the dough must be soft and at room temperature (chilled dough jams the barrel), and the baking sheet must be bare and ungreased — no parchment — because the dough needs to grip the pan to release from the disk. Load the barrel, fit the disk, hold the press flat and flush against the sheet, squeeze once, and lift straight up. If cookies won't stick to the pan, the dough is too cold or the sheet is warm or greased. One press turns out several dozen uniform spritz cookies in minutes, which is why it's the holiday-production favorite.
How To Use Cookie Stamps
Cookie stamps press a design into a ball of dough rather than cutting a shape from a rolled sheet. Roll dough into uniform balls (a portion scoop keeps them even), place them on the lined baking sheet, dip the stamp face in flour, and press straight down with steady pressure until the dough spreads to the stamp's edge. Lift straight up. Like imprint cutters, stamps need firm, low-leavening shortbread-style dough so the design survives the oven.
Using cookie stamps with icing: stamped cookies pair best with thin glazes rather than thick royal icing, which fills and hides the embossing. Flood a thin, translucent glaze over the cooled cookie so it pools in the recessed lines and shadows the design, or keep icing to the border and dust the center with powdered sugar.
What Else Can You Use Cookie Cutters For?
Cookie cutter uses extend far beyond cookies — the same shaped edge portions and decorates anything soft enough to slice. In professional kitchens we regularly see cutters used for:
- Fondant and gum paste: cutting cake-topper shapes and tiered accents.
- Sandwiches and toast: crustless shaped sandwiches for kids' menus, catering trays, and tea service.
- Fruit and melon: shaped fruit for garnishes and fruit trays.
- Eggs and pancakes: set a metal cutter in the pan as a mold for perfectly round (or star-shaped) results.
- Plating garnishes: punching herbs-pressed pasta sheets, polenta cakes, and vegetable slices into uniform shapes for composed plates.
- Biscuits, scones, and doughnuts: round cutters are the standard portioning tool for all three.
One material note: only metal cutters should touch a hot pan (the egg/pancake trick); plastic will warp or melt.
How Do Foodservice Operations Use Cookie Cutters?
In commercial kitchens, cookie cutters are consistency tools first and creativity tools second: they standardize portion size, bake time, and per-unit cost across every tray. That consistency has real economic weight behind it — the U.S. baking industry employs almost 800,000 people, generates over $42 billion in direct wages, and has an overall economic impact of more than $186 billion (American Bakers Association). Decorated and shaped cookies also ride a durable consumer trend: 57% of consumers say they're interested in nostalgic desserts — flavors like cookie dough, s'mores, and birthday cake — and 82% are at least somewhat interested in mini desserts (Datassential), both of which shaped cutout programs serve perfectly: a graduated cutter set literally is a mini-dessert program.
In 15+ years supplying 40,000+ foodservice operations, we've seen the highest-margin use cases repeat across bakeries, hotels, and cafés: seasonal decorated-cookie SKUs (a heart cutter like the Pastry Tek metal heart cutter with comfort grip earns its keep every February), shaped sandwich and garnish work on catering menus, and tiered star displays for holiday counters. Operators running volume standardize on stainless sets, buy bulk cookie cutters so every station has its own, and pair them with the basics — rolling pins, parchment, cooling racks, and portion scoops from a full baking tools lineup — so the workflow in this guide runs the same on every shift. For a worked example of that February SKU, see our recipe for how to make heart-shaped cookies.
Frequently Asked Questions
Are you supposed to use cookie cutters before or after baking?
Use cookie cutters before baking for rolled doughs like sugar cookies and gingerbread — cutting raw, chilled dough gives the cleanest edges. Cut after baking only for slab or bar-style cookies: bake the sheet, then press the cutter through the warm slab within the first minutes out of the oven.
How do you keep cookies from spreading when using cookie cutters?
Chill the cut shapes for 10–15 minutes before baking, use a low-leavening cutout recipe, avoid over-creaming the butter, bake on parchment (never a greased pan), and put the tray into a fully preheated oven. Cold fat plus fast heat locks the shape before it can melt outward.
How do you get cookie cutters to work?
Cookie cutters work when the dough is cold and firm, rolled to an even ¼ inch, and the cutter is dipped in flour between cuts. Press straight down without twisting, peel the scraps away from the shapes, and transfer with an offset spatula. If dough sticks, add flour to the cutter or chill everything for 10 minutes.
How do you make cookies with a cookie cutter?
Make a rolled-cookie dough (sugar cookie or gingerbread), chill it 1–2 hours, and roll it ¼ inch thick. Cut shapes with a floured cutter, transfer them to a parchment-lined sheet, chill 10–15 minutes, then bake at 350°F until the edges just set. Cool completely before decorating.
How do you use cookie cutters correctly?
Correct cookie cutter technique is: chilled dough, even ¼-inch roll, floured cutter, one straight press down, straight lift, scraps peeled away, and a second chill before baking. The single most important rule is never twisting the cutter — twisting distorts the shape and seals the edges.
What is the 3-2-1 cookie rule?
The 3-2-1 rule is a classic shortbread ratio: 3 parts flour, 2 parts fat (butter), and 1 part sugar by weight. It produces a firm, low-spread dough that holds cut edges and stamped impressions exceptionally well, which is why 3-2-1 shortbread is a favorite base for cutout and embossed cookies.
Final Thoughts
How to use cookie cutters comes down to a rhythm you can run every single bake: cold dough, even roll, floured cutter, straight press, clean lift, second chill, hot oven. Add the right tool for the job — cutter for rolled dough, press for spritz, stamp for shortbread — and a material that matches your volume, and misshapen, spreading cookies disappear from your kitchen for good. When you're ready to build or upgrade your set, explore Restaurantware's full cookie and pastry cutters collection — stainless steel sets, comfort-grip shapes, and seasonal designs trusted by 40,000+ foodservice operations.